



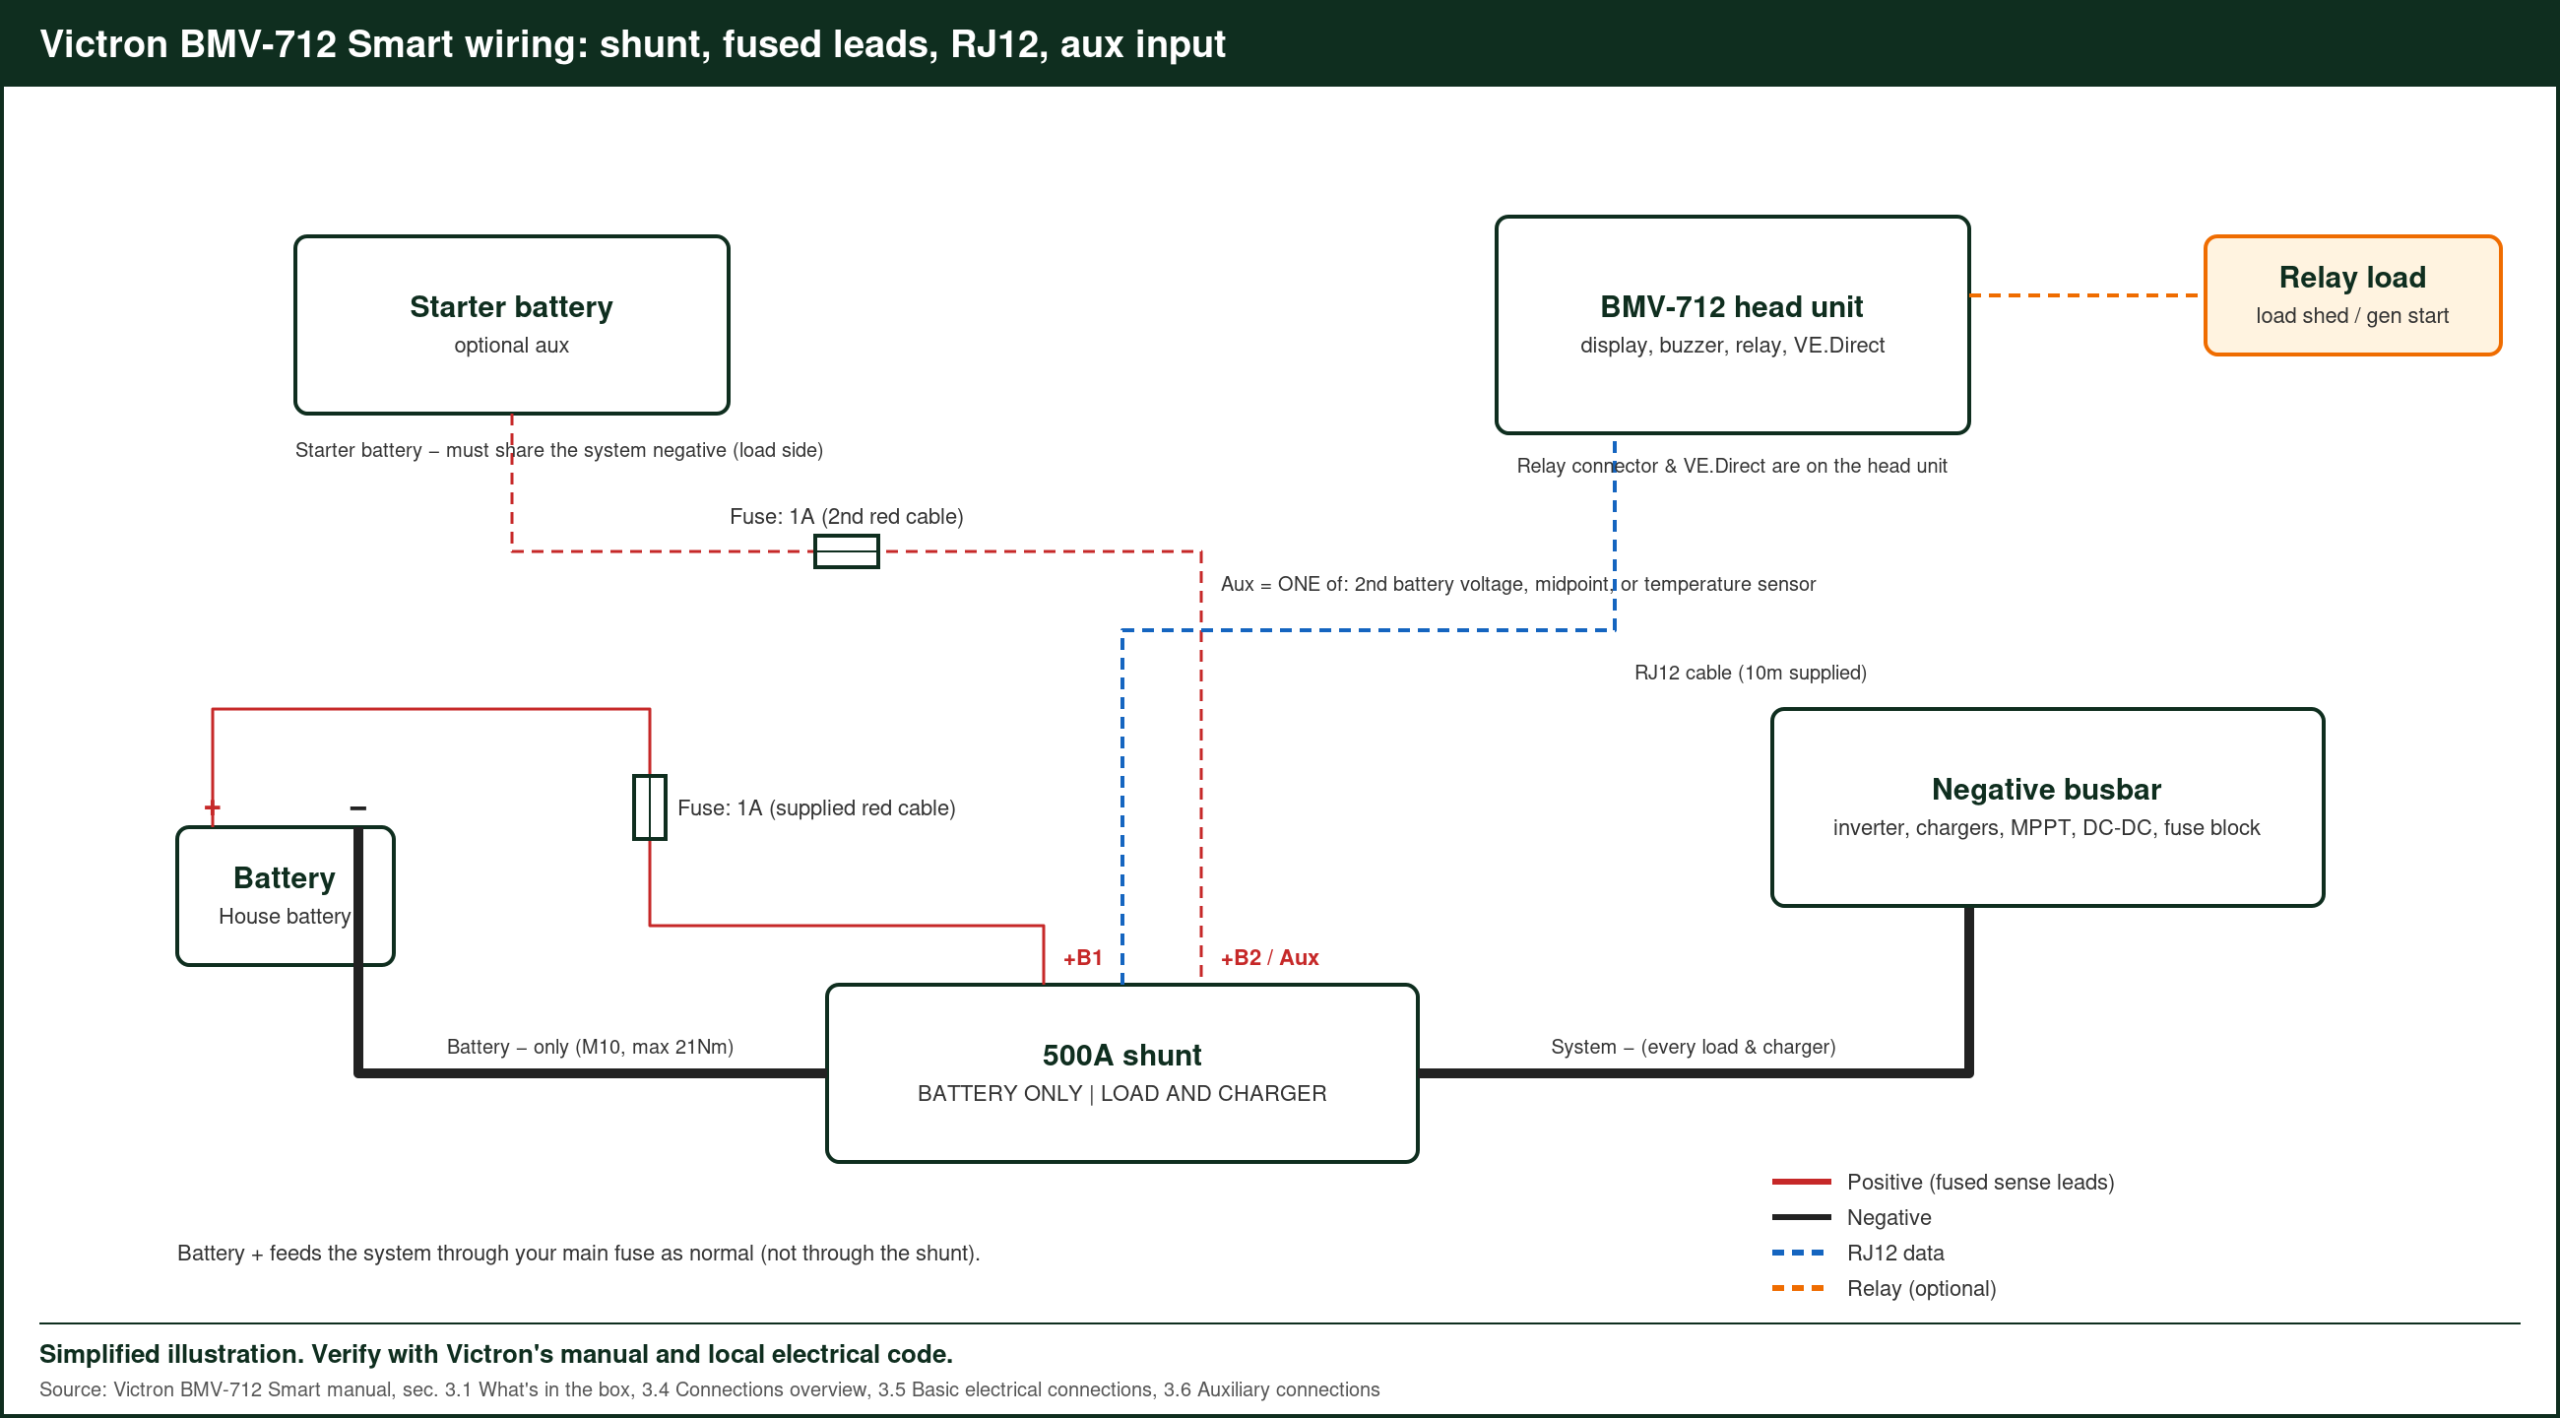
This Victron BMV-712 wiring diagram guide covers the full install: the 500A shunt on the battery negative, the fused power lead, the RJ12 cable to the display, and the optional auxiliary input. All the electrical connections are made on the shunt. The display only needs one data cable, which is why the BMV-712 is easy to fit even when the batteries are far from the dashboard.
Electrical work can be dangerous: follow the manual, fuse and size every cable correctly, and use a licensed electrician for anything connected to household wiring.
Victron BMV-712 Wiring Diagram: What’s in the Box
Victron’s BMV-712 manual lists a 500A shunt, a 10m RJ12 cable, and two 1.5m red cables with 1A fuses (one for the main battery positive, one for the optional aux input). It also includes round and square front bezels and mounting hardware.
| Connection | From | To |
|---|---|---|
| Battery minus terminal (shunt) | Battery negative post | Shunt “battery” side |
| System minus terminal (shunt) | Shunt “system” side | Negative busbar: every load and charger |
| Fused positive (Vbatt+) | Shunt PCB | Battery positive |
| RJ12 | Shunt PCB | Back of the BMV-712 display |
| Aux input (optional) | Shunt PCB | Starter battery positive, midpoint, or temperature sensor |
| Relay (optional) | BMV-712 relay contacts (see manual) | Load-shed relay or generator start |
Step by Step
- Disconnect everything from the battery negative.
- Bolt the shunt so only the battery negative goes on the battery side.
- Move every negative, including inverter, charger, MPPT, DC-DC and fuse block, to the system side or a busbar fed from it.
- Connect the fused power lead to battery positive.
- Run the RJ12 cable to the display and mount it with the bezel you prefer.
- Optional aux: use a second fused lead to a starter battery, or a midpoint on a series bank, or fit the temperature sensor accessory. You can only use one aux function at a time.
- Reconnect and pair with VictronConnect over Bluetooth.
BMV-712 Lithium Settings
Victron’s lithium guidance for its battery monitors (from the SmartShunt manual):
| Setting | Value for LiFePO4 |
|---|---|
| Battery capacity | Your bank’s Ah rating |
| Peukert exponent | 1.05 |
| Charge efficiency factor | 99% |
| Discharge floor | 10–20% |
| Charged voltage and tail current | Match your charger so the monitor syncs to 100% at the right point |
Victron also publishes a “Sync settings for Lithium batteries – BMV-712 Smart” document on its product page. Read it if the state of charge drifts.
Lithium Warning
The BMV-712 draws about 1mA (0.7Ah a month at 12V). Victron warns that after a low-voltage shutdown, a Li-ion battery has only about 1Ah per 100Ah left. A 10mA standing load can damage a 200Ah battery left discharged for more than 8 days. Disconnect the battery for long storage.
For the complete spec sheet and current manual, see the Victron BMV-712 Smart page.
Lead-Acid Defaults vs Lithium Settings
| Setting | Typical lead-acid default | LiFePO4 (Victron guidance) |
|---|---|---|
| Peukert exponent | 1.25 | 1.05 |
| Charge efficiency factor | 95% | 99% |
| Discharge floor | 50% | 10–20% |
| Charged voltage | Set to suit your charger | Set to suit your charger |
| Tail current | 4% | Match the charger’s end of charge |
Check your BMV-712’s current defaults in VictronConnect; firmware updates can change them.
Using the Aux Input
- Starter battery: shows the vehicle or engine battery voltage alongside the house bank, handy in vans and boats.
- Midpoint monitoring: on a series bank of 12V lead-acid batteries, the BMV-712 compares the two halves and alerts you if they drift apart.
- Temperature: with Victron’s temperature sensor accessory, the BMV shows battery temperature and can send it to other Smart products over VE.Smart Networking.
Setting Up Alarms and the Relay
| Alarm | Example setting |
|---|---|
| Low state of charge | Alarm at 20%, clear at 30% |
| Low voltage | Set a little above the battery’s low-voltage cut-off |
| High voltage | Set just above the charger’s absorption voltage |
Example values. The relay can follow the same conditions, so it can switch off a load or start a generator when the state of charge drops.
Synchronizing to 100%
The BMV-712 resets to 100% when the battery voltage reaches the charged voltage and the current drops below the tail current for the set time. If it doesn’t sync, check that the charged voltage is a little below your charger’s absorption voltage. After installation, give the battery a full charge so the BMV starts from an accurate 100%.
Connecting to a Cerbo GX
The BMV-712’s VE.Direct port connects to a Cerbo GX with a VE.Direct cable. The Cerbo then shows state of charge on its display and sends it to VRM, and DVCC can share battery data with other chargers.
VE.Smart Networking
Over Bluetooth, the BMV-712 can share battery voltage, current and temperature with MPPTs and Orion chargers on a VE.Smart Network, so every charger works from the same battery readings.
Installation Tips
Mount the shunt where you can reach it, close to the battery negative. Keep the RJ12 cable away from high-current cables where possible, and secure it so it can’t be pinched. Use the bezel that suits your panel cut-out, and position the display where you’ll see it every day, such as by the entry door.
FAQ
Can I extend the RJ12 cable?
The included cable is 10m. Use a standard RJ12 cable if you need a different length.
What does the relay do?
Victron says it can turn off non-critical loads or run a generator. It’s bi-stable, so it doesn’t add current draw in an alarm state.
BMV-712 or SmartShunt?
Same measurement idea. The BMV adds the display, alarm and relay.
Do I need to recalibrate the BMV-712?
It syncs automatically each time the battery reaches full charge. Charge to full regularly so the reading stays accurate.
Can the BMV-712 show time remaining?
Yes. It shows time to go based on the current draw and remaining capacity.
Sources: Victron BMV-712 Smart datasheet and product page, SmartShunt manual (victronenergy.com, accessed Oct 2026).
Related: LiTime 12V 50Ah LiFePO4 Battery Review, Klein CL390 Clamp Meter Solar Panel Test, LiTime 12V 20A Lithium Battery Charger Review, plus the Victron Energy Guide